超簡単にXcode5でstoryboardを使わずに新規プロジェクトを作る方法
2014/07/17 カテゴリー:アプリ開発 タグ:タグ: Objective-C, Xcode
もっともっとシンプルにstoryboardを使わずに新規プロジェクトを作る方法を公開しました
以前の記事
[MN]Xcode5ではstoryboardを使わなきゃいけないの!? | Make&Nature
ではstoryboardを使わない方法を紹介しましたが、
もっとシンプルにしてみました
storyboardを使わずに超簡単に新規プロジェクトを作る
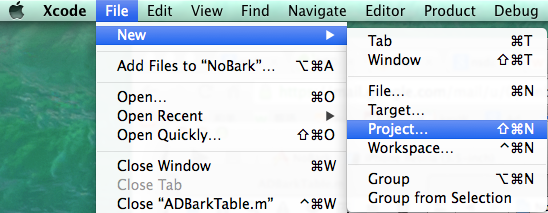
まず、新規プロジェクトを選びます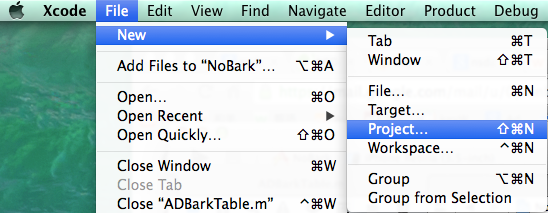 次に「Empty Application」を選びます
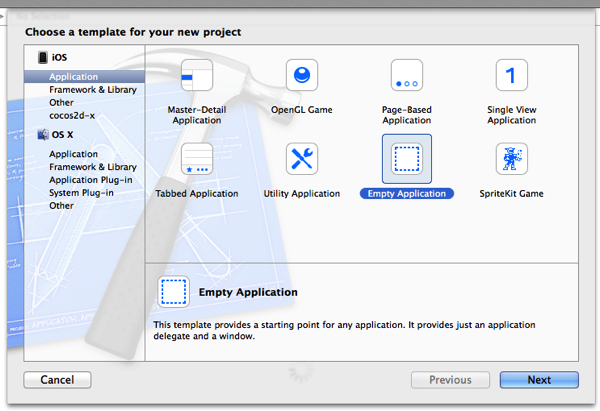
「Next」を押していって生成されました。
ADAppDelegate.mを開きます
すると、このようになっています。
|
1 2 3 4 5 6 7 8 9 10 11 12 13 14 15 16 17 18 19 20 21 22 23 24 25 26 27 28 29 30 31 32 33 34 35 36 37 38 39 40 41 |
#import "ADAppDelegate.h" @implementation ADAppDelegate - (BOOL)application:(UIApplication *)application didFinishLaunchingWithOptions:(NSDictionary *)launchOptions { self.window = [[UIWindow alloc] initWithFrame:[[UIScreen mainScreen] bounds]]; // Override point for customization after application launch. self.window.backgroundColor = [UIColor whiteColor]; [self.window makeKeyAndVisible]; return YES; } - (void)applicationWillResignActive:(UIApplication *)application { // Sent when the application is about to move from active to inactive state. This can occur for certain types of temporary interruptions (such as an incoming phone call or SMS message) or when the user quits the application and it begins the transition to the background state. // Use this method to pause ongoing tasks, disable timers, and throttle down OpenGL ES frame rates. Games should use this method to pause the game. } - (void)applicationDidEnterBackground:(UIApplication *)application { // Use this method to release shared resources, save user data, invalidate timers, and store enough application state information to restore your application to its current state in case it is terminated later. // If your application supports background execution, this method is called instead of applicationWillTerminate: when the user quits. } - (void)applicationWillEnterForeground:(UIApplication *)application { // Called as part of the transition from the background to the inactive state; here you can undo many of the changes made on entering the background. } - (void)applicationDidBecomeActive:(UIApplication *)application { // Restart any tasks that were paused (or not yet started) while the application was inactive. If the application was previously in the background, optionally refresh the user interface. } - (void)applicationWillTerminate:(UIApplication *)application { // Called when the application is about to terminate. Save data if appropriate. See also applicationDidEnterBackground:. } @end |
長い!
英語のコメントが多い!
目障り!(あくまで個人的な感想です)
なのでスッキリさせてみた。
さらに、最初の画面(rootView)を開くとこまで追加しておきました
(この例ではADTableViewController)
|
1 2 3 4 5 6 7 8 9 10 11 12 13 14 15 16 17 18 19 20 21 22 23 24 25 26 27 28 29 30 31 32 33 34 35 36 37 38 39 40 41 |
#import "ADAppDelegate.h" #import "ADTableViewController.h" @implementation ADAppDelegate - (BOOL)application:(UIApplication *)application didFinishLaunchingWithOptions:(NSDictionary *)launchOptions { self.window = [[UIWindow alloc] initWithFrame:[[UIScreen mainScreen] bounds]]; self.window.backgroundColor = [UIColor whiteColor]; // ここから ADTableViewController *loginVC = [[ADTableViewController alloc] init]; UINavigationController *navC = [[UINavigationController alloc] initWithRootViewController:loginVC]; self.window.rootViewController = navC; // ここまで追加した [self.window makeKeyAndVisible]; return YES; } - (void)applicationWillResignActive:(UIApplication *)application { } - (void)applicationDidEnterBackground:(UIApplication *)application { } - (void)applicationWillEnterForeground:(UIApplication *)application { } - (void)applicationDidBecomeActive:(UIApplication *)application { } - (void)applicationWillTerminate:(UIApplication *)application { } @end |
これで、スッキリ!と始められます
これだけで、起動するとルートビューが開きます
(今回の場合、ADTableViewController)
«前へ UITableViewのテンプレート 次へ» UISlider
あわせて読みたい
-

cocos2d-x でのプロジェクトの作成 mac
-
配列NSArrayとNSMutableArrayのよく使う構文
-

UITableViewのテンプレート
-

iPhone, iPadの画面の向きを検出する【起動時と変化時】
-

Xcode5ではstoryboardを使わなきゃいけないの!?
-
【iOS In-App Purchases (アプリ内課金)】Product IDが認識されなかった時にやったこと
-

iPhoneアプリ開発で使うと便利!sortedArrayUsingDescriptorsで昇順、降順の並び替え
-

【Objective-C】iPhoneアプリの作成方法:iOS In-App Purchases (アプリ内課金)プログラム 整理
-

あなたは大丈夫?こんな生活習慣がメタボ腹を作る!10のチェックポイント


